


NFTIt is a tool that only exists in the blockchain field and has a wide range of applications and opportunities. The ERC721 token standard can build a variety of applications such as collectibles, independent tokens, notes, games, etc. For developers who want to participate in the construction, a dynamic andRandom NFTis a great place to start. But what can we do with it now? Wouldnt it be great to show off your newly minted randomized or dynamic character?
exampleexample, is what we want to achieve.
first level title
text
Homogenization"Homogenization"tokens, which means that the tokens are all fungible and each have the same value. Well dig deeper into how these are built, and how the community can represent them across platforms. you can alsoOpenSea NFT BibleRead more in .
If you havent read the previous article aboutGet random number in NFTPlease review the article!developer pagefirst level title
What is metadata?
In the last blog, we learned how to build random NFTs. Now, well take it to the next level with another important part of the ERC721 standard: *metadata*.
image description

text
For $20, adding such a graphic to the blockchain doesnt really get NFT creators excited.
we realizeEthereum 2.0Will solve a lot of these scaling headaches (also congratulations on the successful launch of ETH2.0), but at present the community needs a standard to help solve this problem. Metadata is the answer to this question.
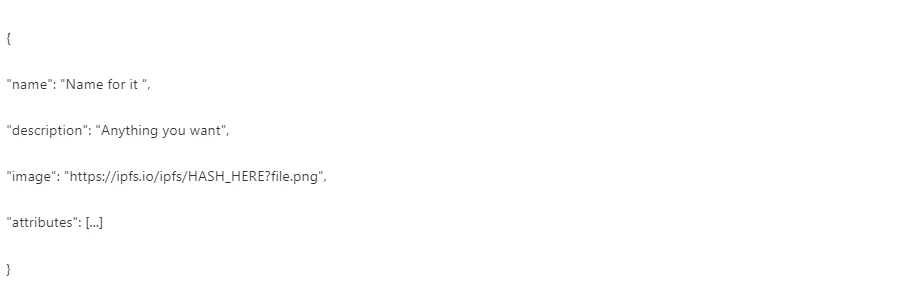
Metadata provides descriptive information for tokenId stored off-chain. These are simple APIs that are called by the off-chain UI to gather all the information about the token. Each tokenId has a specific tokenURI that defines this API call, which returns a JSON object that looks like this:

Metadata has four different keys:
`name`, defines the human-readable name of the tokenIds
`description`, which provides some background information about the token
`image` is another URI for the image
`attributes` is token statistics
If your NFT interacts with other NFTs, it is very important to ensure that the attributes on the tokenURI match those of your NFT smart contract, otherwise you may end up with a Confused!
After assigning tokenIds to `tokenURI`, the NFT marketplace will be able to display your tokens, allowing you to showcase your creativity. you can atOpenSea marketplace for Rinkeby testnetSee above we use the updatedDungeon and Dragon Random NFT Code WarehouseAn NFT created. There are many such markets, such asMintable、Rarible。
text
You can always store all metadata on-chain (in fact, its the only way to interact with tokens), but a lot of NFT marketplaces dont know how to read on-chain metadata_right now. _So for now, it is ideal to use off-chain metadata to visualize your tokens while having all the on-chain metadata so your tokens can interact with each other.
Names, descriptions, and attributes are easy to store on-chain, but images are the hard part. Also, where do we store the tokenURI for the API? A lot of people choose to run servers to host information, which is fine, but this is a centralized place to visualize tokens. It would be a better choice if we could store the pictures on the chain so that they would not go down or be hacked. In the example above, their images are using a link toIPFSURL, which is a common way to store images.
IPFS is the abbreviation of InterPlanetary File System (Interplanetary File System), which is a peer-to-peer hypermedia protocol designed to make the network faster, safer and more open. It allows anyone to upload a file, and the file is hash-checked, so if the file changes, its hash will change too. This is ideal for storing images, as it means that every time the image is updated, the hash/tokenURI on-chain also changes, and it means we can have a history of the metadata. Adding images to IPFS is also very easy and doesnt require running a server.
image description
The `levels` section is where the tokens random stats go!
Give you an extra surprise
Now, friends reading this, we have an extra surprise for you. Well cover how to deploy these NFTs in a second, but before that, the four tokens well create in this game, will be in the firstNFT Treasure HuntFight in!
here are themMainnet marketfirst level title
How to deploy your dynamic NFT marketplace
Again, we use the latest version of theDungeons & DragonsThe code warehouse is also explained in the readme.
Heres what were going to do:
1. Build a verifiably random DD character using Chainlink VRF
2. Add a tokenURI using IPFS
3. Add random NFT to OpenSea market
orChainlink Price FeedsorChainlink API。
previous articleprevious articleDont worry too.
you need to have in your walletRinkeby Testnet ETHand Rinkeby Testnet LINKsecondary title
Configure environment variables
Configure `MNEMONIC` and a rinkeby `RINKEBY_RPC_URL` environment variable. Your `MNEMONIC` is the seed phrase for your wallet. You can find a `RINKEBY_RPC_URL` from the node provider service likeInfura。
Then, set them in the `bash_profile` file, or export them to your terminal like this:

secondary title
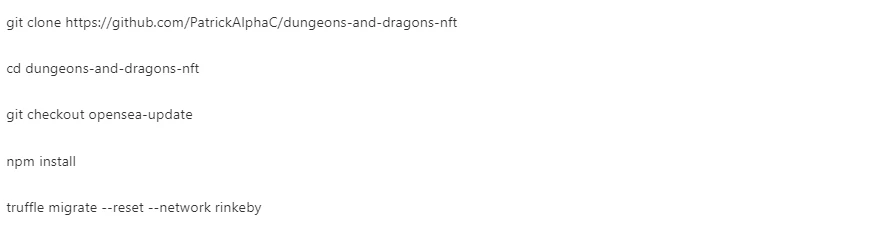
Clone the repository and deploy
secondary title
You can try to create a role with the following command:

The above command can create a new character with random data!
Depending on how often you deploy, you can choose which character to use by changing the `dnd.getCharacterOverView(1)` command in `get-character.js`, replacing `0` with whatever characters tokenId you like.
secondary title
text
you can get one for freeEtherscan APIkey, and interact with the NFT on the chain. Then set `ETHERSCAN_API_KEY` as an environment variable.

This will verify and publish your contract, which can be viewed in the `Read Contract` section of the Etherscan it gives you.
or you can useoneclickdappfirst level title
text
After creating NFTs, we need to give them a `tokenURI`. TokenURI is the standard for displaying NFTs data to the world. It can make it easier for us to store content such as pictures without wasting energy storing them on the chain.
first level title
Download IPFS and IPFS Companion (IPFS Companion)
Now, we will store these images and metadata in IPFS. you need to
1. IPFS
3. Pinata
IPFS Companion allows us to view IPFS data natively in browsers like Brave or Chrome. And Pinata allows us to maintain the normal operation of IPFS files even when the node is down (dont worry about this problem for now).
If you click this link in your browser, youll know IPFS Companion is working:
https://ipfs.io/ipfs/QmTgqnhFBMkfT9s8PHKcdXBn1f5bG3Q5hmBaR4U6hoTvb1?filename=Chainlink_Elf.png。
image description
secondary title
Add image to IPFS
After the IPFS node is established, you can start adding files to it. The first step is to upload the image of our NFT. Go to IPFS-installed"files"image description
IPFS file
What does this DD character look like? Add it to your IPFS node, then"Pin "secondary title
Add metadata file to IPFS
The metadata JSON object then needs to be added to IPFS. The name and properties need to be fetched from the deployed token. We do some work in the `create-metadata.js` script. just run
truffle exec scripts/create-metadata.js --network rinkeby
image description
secondary title
Pinata
image description
Copy CID
This metadata json file is `tokenURI`, so we use the tokenId for the image NFT to modify `set-token-uri.js` and add the ipfs tokenURI.
Then we use
truffle exec scripts/set-token-uri.js --network rinkeby
thisthisSample. We need to register an account in OpenSea first.
Here is the link to add your testnet NFT contract to view on openseaNext step
Next step
We should all be ready! There is a lot of information covered above, so if you have any questions, be sure to contact ourDiscord. Smart contracts and Chainlink engineers have a huge community, and a lot of good people are coming together to push NFTs and smart contracts into the spotlight, so Discord is also a great place to meet other friends. do you want to seeChainlink Buildersprogram, where you can win some cool prizes by building with Chainlink!
development documentationdevelopment documentation, you can also subscribe toChainlink NewsletterCome learn about the latest developments in Chainlink.
orTwitter、DiscordorRedditShare it and tag your repo with #chainlink.


